Obtaining a credential
Provisioning
This codelab teaches you how to implement OpenID4VCI (OpenID Connect for Verifiable Credential Issuance) in a Kotlin Multiplatform mobile wallet application. You'll build a working wallet that can receive and store digital credentials like Utopia membership, supporting both Android and iOS platforms.
The issuer.multipaz.org server is just for testing, you can create your own server for production use. You can refer to the source code for more info Architecture Overview
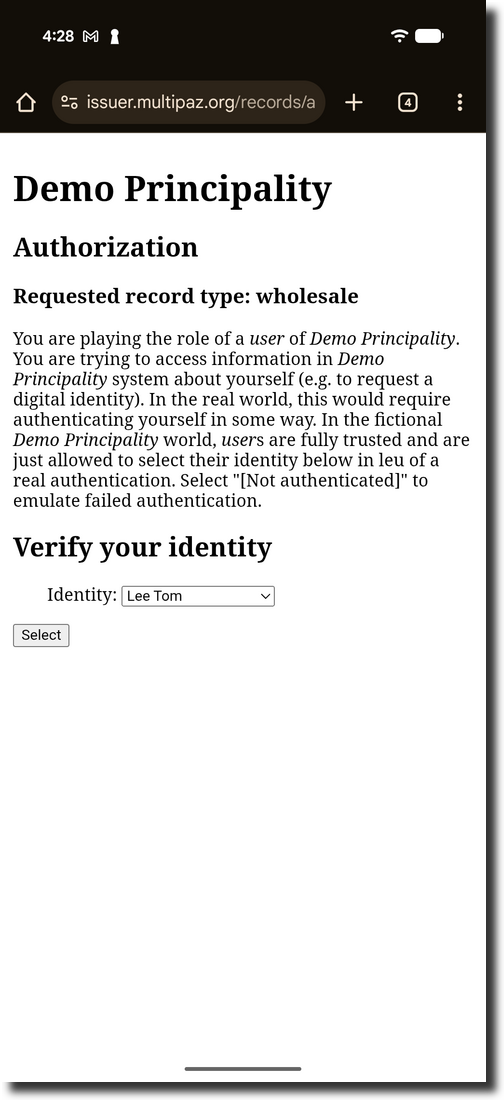
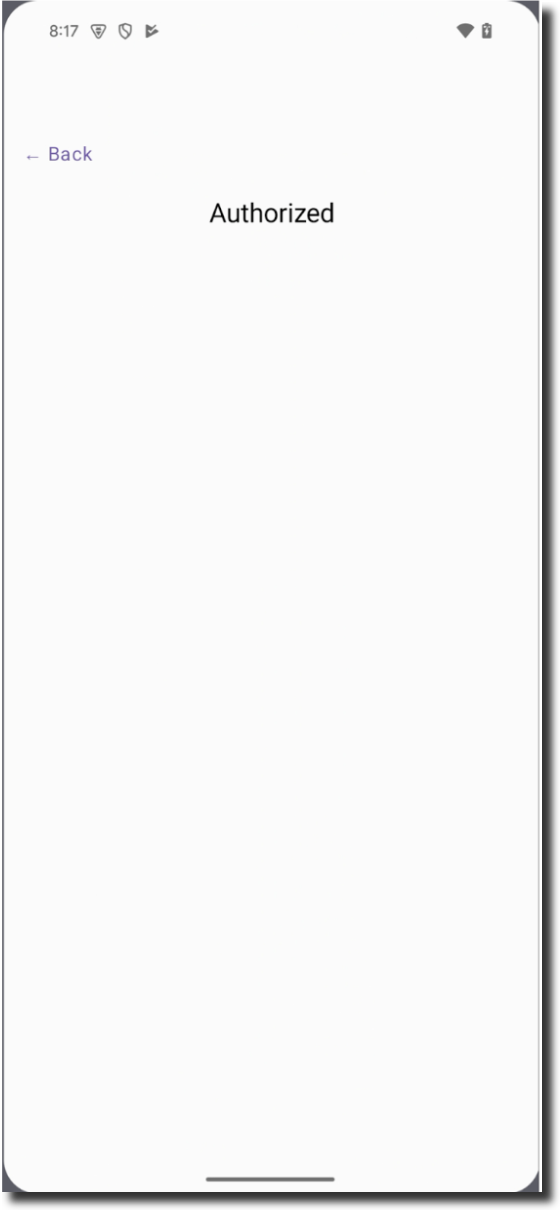
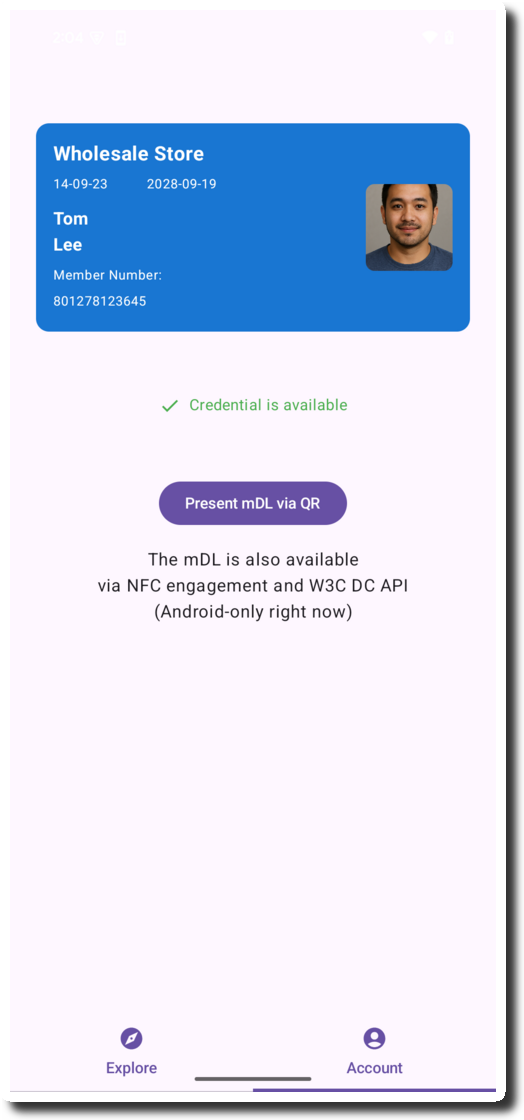
The screenshots below illustrate the provisioning process:
-
In the app, click “Get Credentials from Issuer”
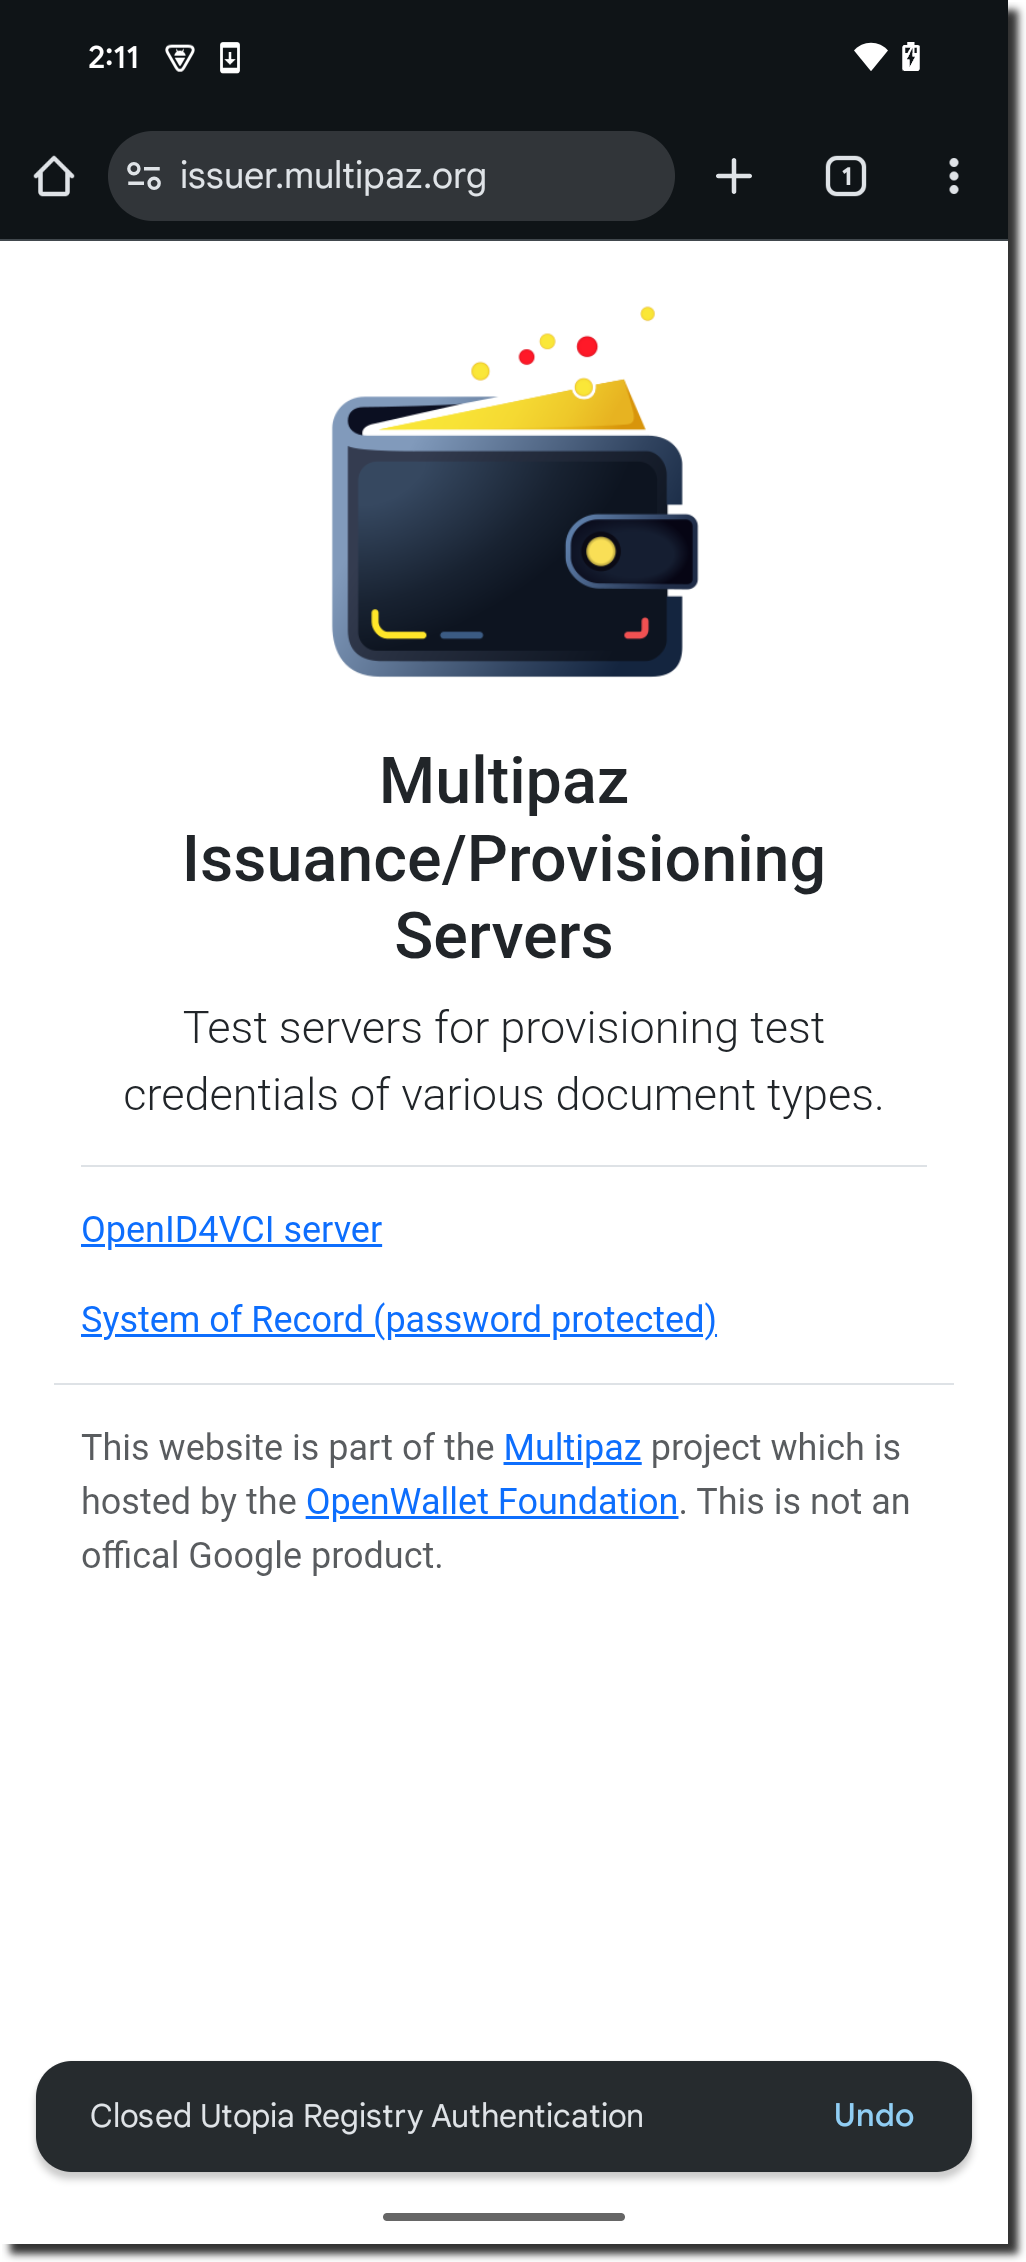
-
The browser opens at issuer.multipaz.org → click “OpenID4VCI server”
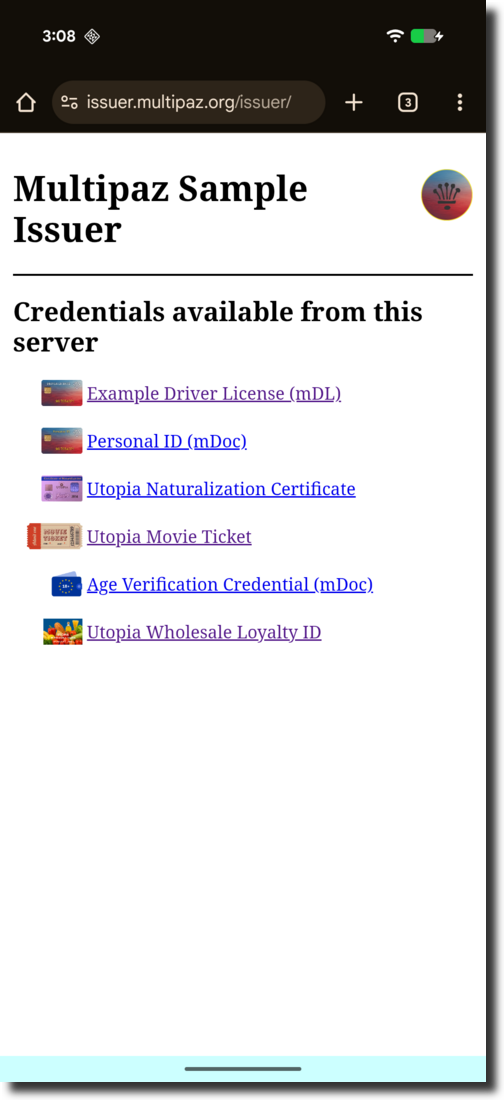
-
Select the “Utopia Wholesale” credential
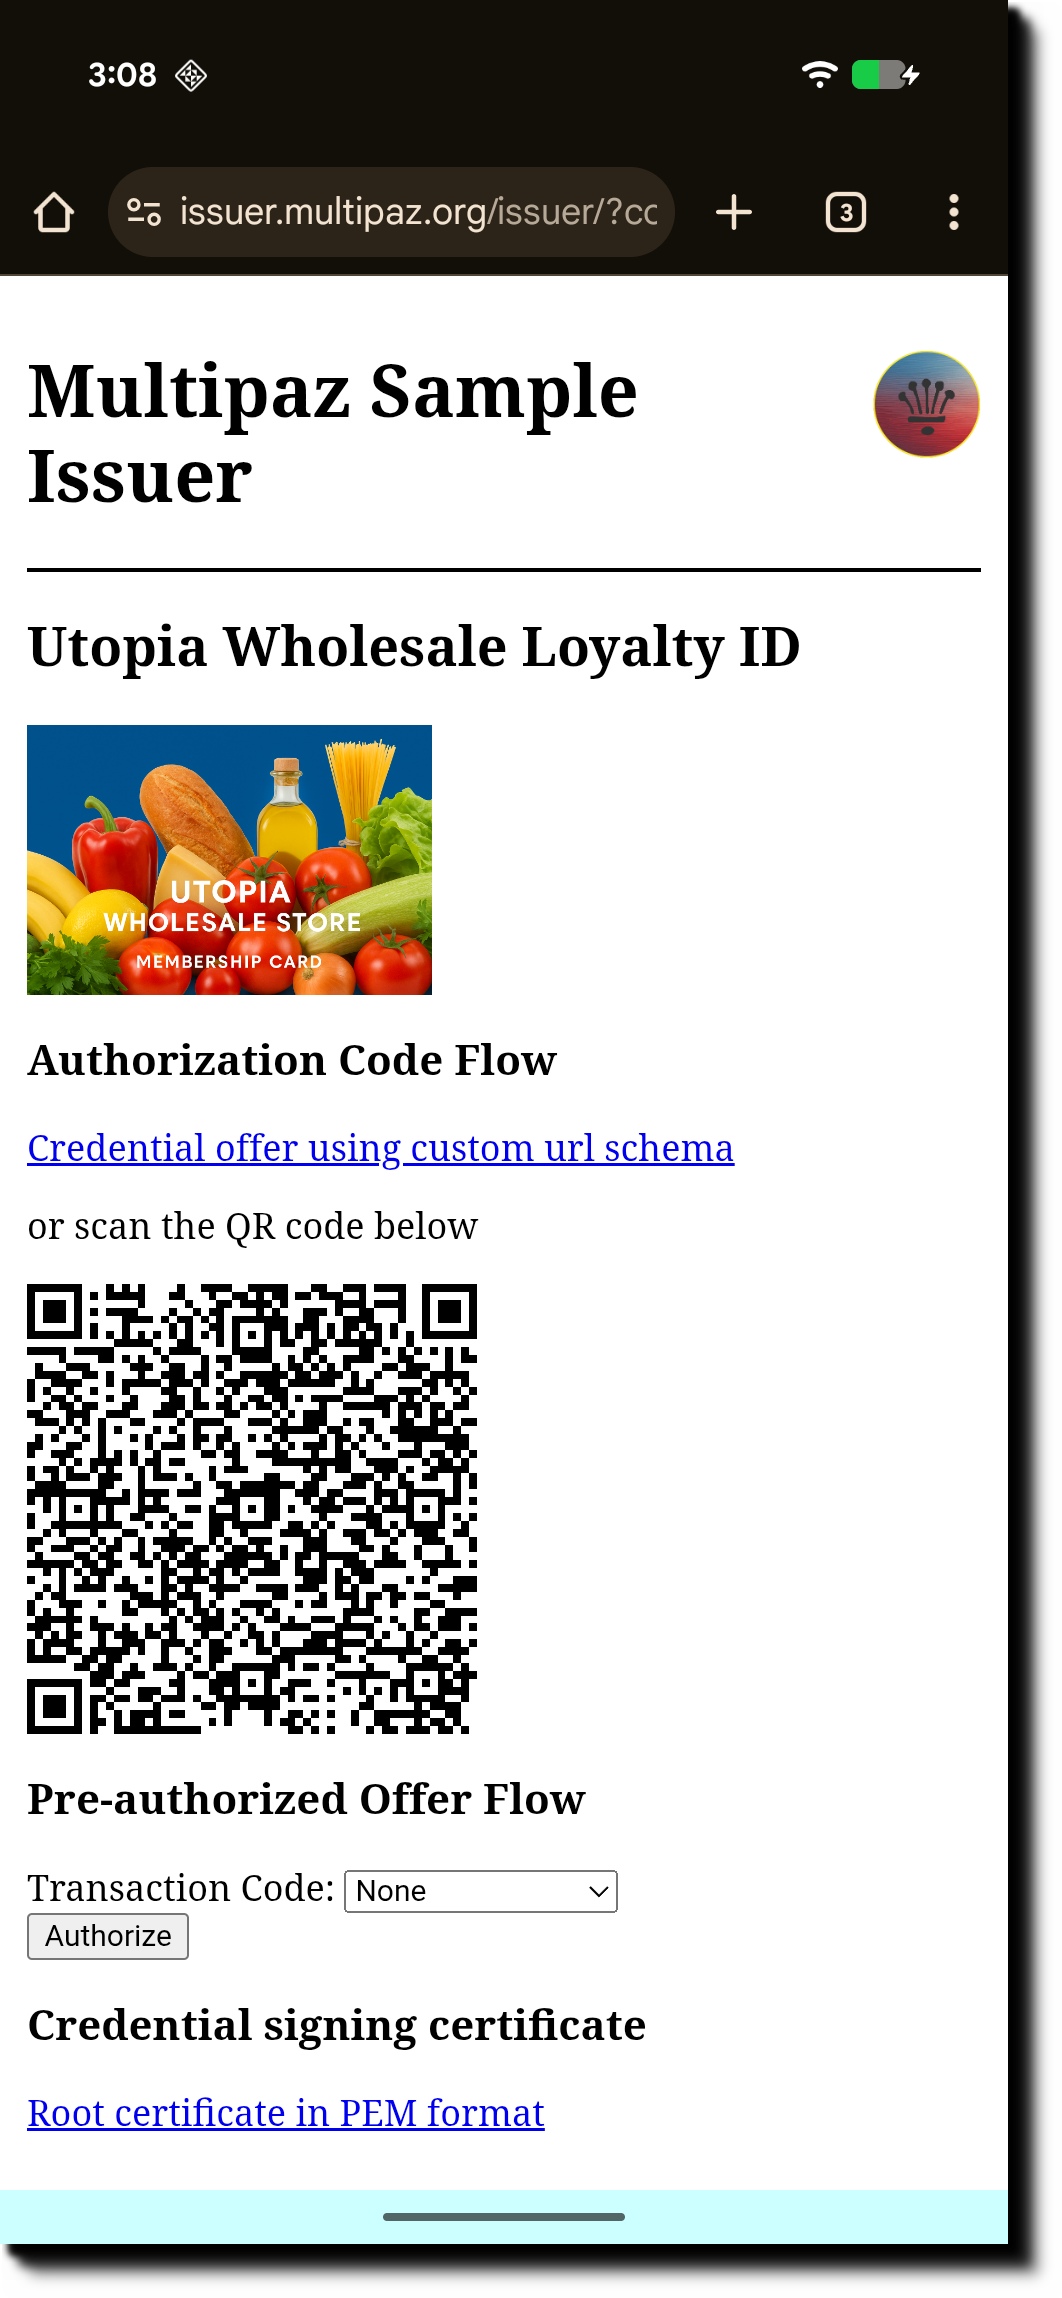
-
Click “Credential Offer using custom URL scheme”
-
Complete the Provisioning step
-
On the Verification Page, select the person(In our app, please select "Lee Tom")
-
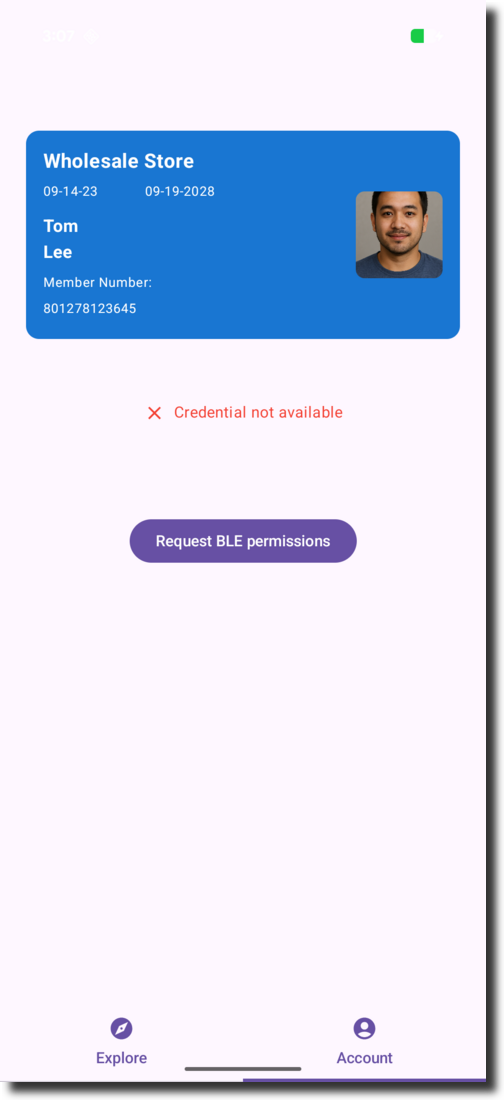
The Credential is issued
-
Back in the app, click “Present mDL via QR”
-
The QR code is displayed


What is Identity Credential Provisioning?
Identity credential provisioning is the process of securely issuing digital credentials (like driver's licenses, passports, or other identity documents) to a user's digital wallet. This process involves:
- Authentication: Verifying the user's identity
- Authorization: Determining what credentials the user is eligible to receive
- Issuance: Securely transferring the credentials to the user's wallet
- Storage: Safely storing the credentials in the wallet's secure storage
Platform Setup
This application supports both Android and iOS platforms. Each platform requires specific configuration for handling deep links and URL schemes during the credential provisioning flow.
Android Setup
Step 1: Configure AndroidManifest.xml
First, set your project's android:launchMode="singleInstance" in AndroidManifest.xml to prevent
unnecessary recompositions, which may otherwise break the issuance process.
The Android app uses intent filters to handle deep links. Configure three types of URL schemes:
1. Custom URI Scheme (Default - Enabled)
<!-- Option #1 - Custom URI Scheme (default) -->
<!-- Must match ApplicationSupportLocal.APP_LINK_SERVER -->
<intent-filter>
    <action android:name="android.intent.action.VIEW" />
    <category android:name="android.intent.category.DEFAULT" />
    <category android:name="android.intent.category.BROWSABLE" />
    <data android:scheme="wholesale-test-app"/>
    <data android:host="landing"/>
</intent-filter>
2. HTTPS App Links (Optional - Higher Security)
<!-- Option #2 - HTTPS App Links - Requires .well-known/assetlinks.json -->
<!-- Examples: https://apps.multipaz.org/landing/ -->
<!-- Must match ApplicationSupportLocal.APP_LINK_SERVER -->
<!--<intent-filter android:autoVerify="true">
    <action android:name="android.intent.action.VIEW" />
    <category android:name="android.intent.category.DEFAULT" />
    <category android:name="android.intent.category.BROWSABLE" />
    <data
        android:scheme="https"
        android:host="apps.multipaz.org"
        android:pathPattern="/landing/.*"/>
</intent-filter>-->
3. OpenID4VCI Credential Offers
<!-- OpenID4VCI Credential Offers -->
<!-- Examples: openid-credential-offer://, haip:// -->
<intent-filter>
    <action android:name="android.intent.action.VIEW" />
    <category android:name="android.intent.category.DEFAULT" />
    <category android:name="android.intent.category.BROWSABLE" />
    <!--  OpenId Credential Offer scheme (OID4VCI) -->
    <data android:scheme="openid-credential-offer"/>
    <!--  High Assurance Interoperability Profile -->
    <data android:scheme="haip"/>
    <!-- Accept all hosts for any of the defined schemes above -->
    <data android:host="*"/>
</intent-filter>
Step 2: Handle URLs in MainActivity
In MainActivity.kt, the app handles incoming URLs:
fun handleUrl(url: String) {
    handleUrl(
        url = url,
        credentialOffers = credentialOffers,
        provisioningModel = provisioningModel,
        provisioningSupport = provisioningSupport
    )
}
iOS Setup
Step 1: Configure Info.plist
The iOS app requires URL scheme configuration in Info.plist to handle deep links and custom URL schemes. Info.plist (Information Property List) is a configuration file that contains metadata about your iOS app, including supported URL schemes, app permissions, and other settings.
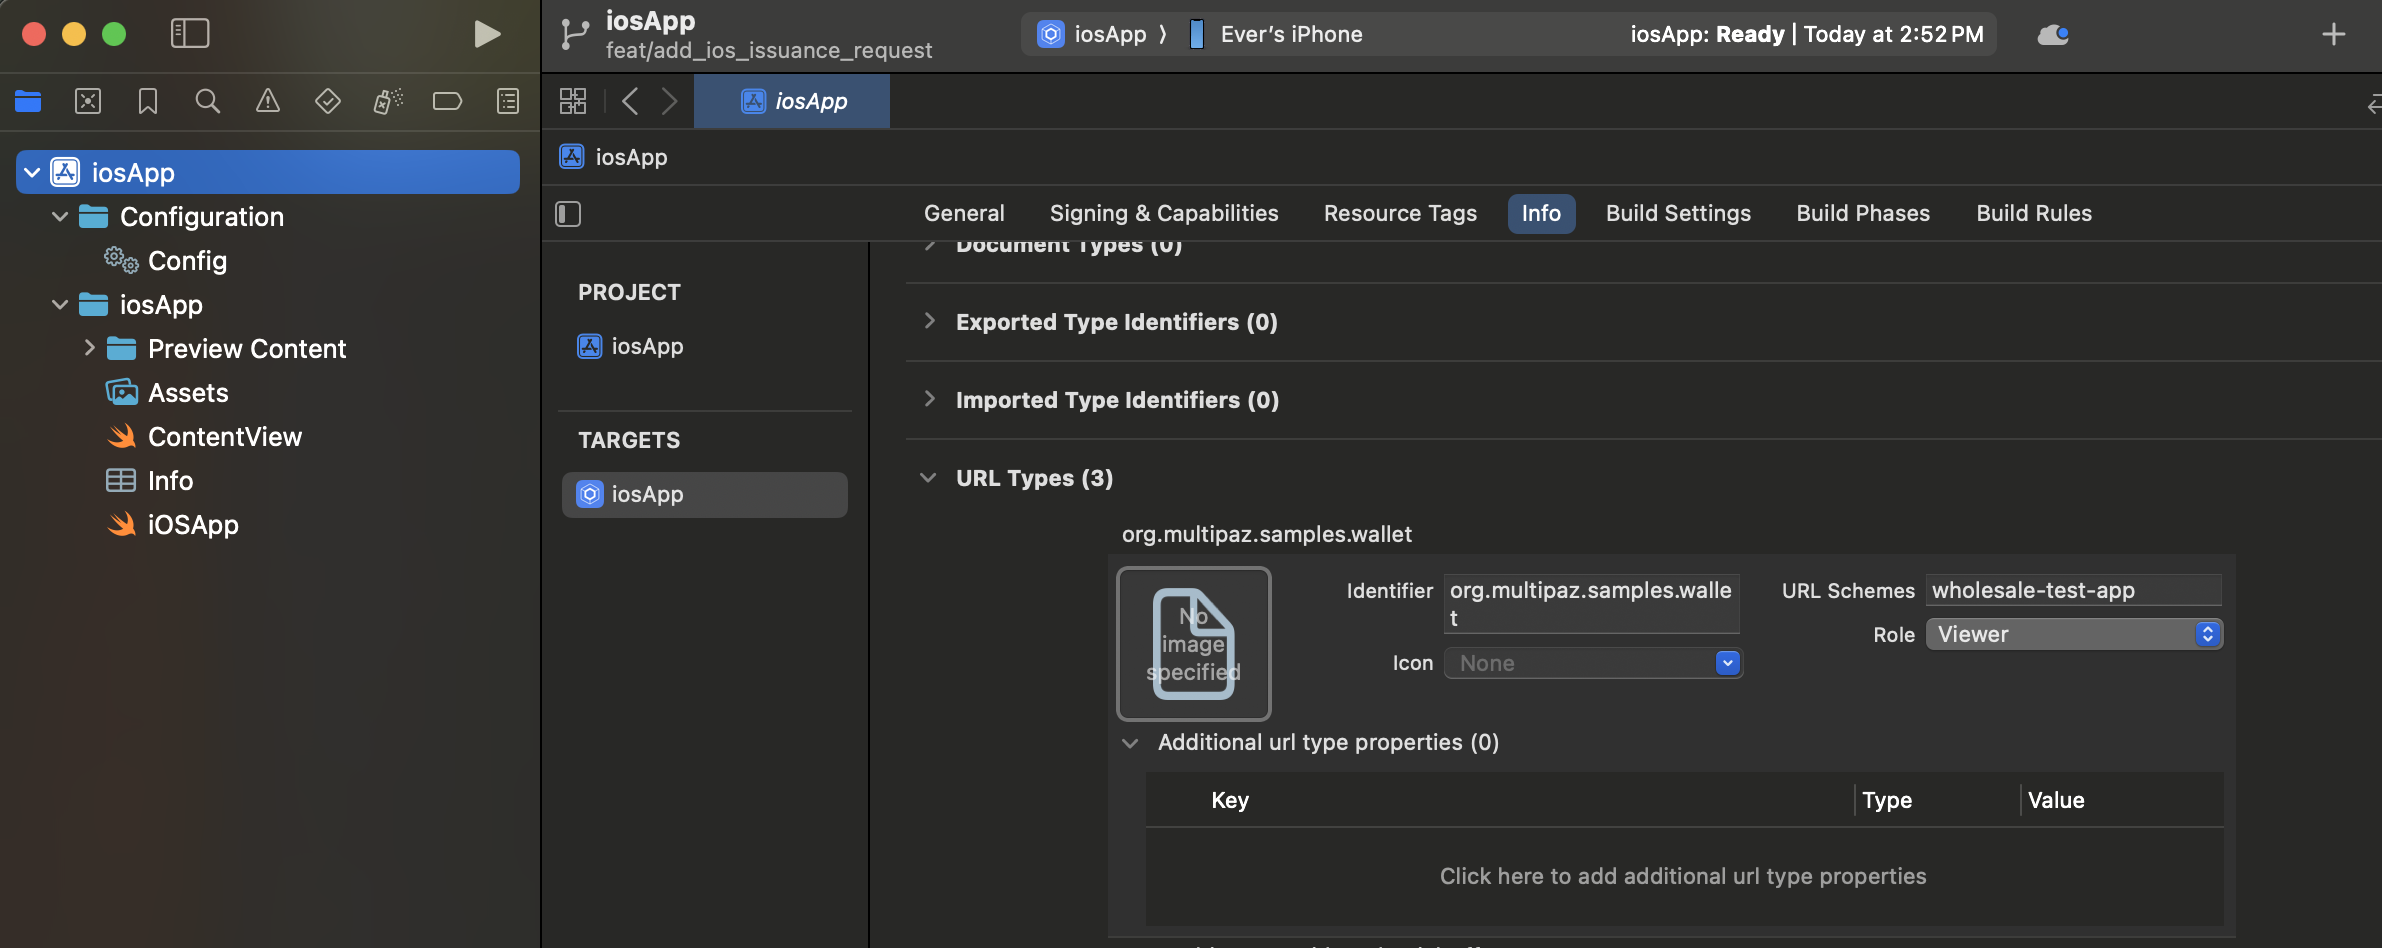
Configuring URL Types in Xcode:
You can configure URL schemes directly in Xcode using the Info tab:
- Open your iOS app target in Xcode
- Select the Info tab in the project settings
- Expand the URL Types section
- Click the + button to add a new URL Type
- Configure each URL scheme with:
- Identifier: A reverse DNS identifier (e.g.,
org.multipaz.samples.wallet) - URL Schemes: The custom scheme name (e.g.,
wholesale-test-app) - Role: Typically set to "Viewer" for custom schemes
- Identifier: A reverse DNS identifier (e.g.,
Manual Configuration (Alternative):
If you prefer to edit the XML directly, add the following to your Info.plist file:
<key>CFBundleURLTypes</key>
<array>
    <!-- Custom URL Scheme for OAuth Callbacks -->
    <dict>
        <key>CFBundleTypeRole</key>
        <string>Viewer</string>
        <key>CFBundleURLName</key>
        <string>org.multipaz.samples.wallet</string>
        <key>CFBundleURLSchemes</key>
        <array>
            <string>wholesale-test-app</string>
        </array>
    </dict>

    <!-- OpenID Credential Offer Scheme -->
    <dict>
        <key>CFBundleTypeRole</key>
        <string>Viewer</string>
        <key>CFBundleURLName</key>
        <string>org.multipaz.openid.credential-offer</string>
        <key>CFBundleURLSchemes</key>
        <array>
            <string>openid-credential-offer</string>
        </array>
    </dict>

    <!-- HAIP Scheme -->
    <dict>
        <key>CFBundleTypeRole</key>
        <string>Viewer</string>
        <key>CFBundleURLName</key>
        <string>org.multipaz.openid.haip</string>
        <key>CFBundleURLSchemes</key>
        <array>
            <string>haip</string>
        </array>
    </dict>
</array>
Step 2: Configure ContentView.swift
In ContentView.swift, add the .onOpenURL modifier to handle incoming URLs:
struct ContentView: View {
    var body: some View {
        ComposeView()
            .ignoresSafeArea()
            .onOpenURL(perform: { url in
                MainViewControllerKt.HandleUrl(url: url.absoluteString)
            })
    }
}
Step 3: Implement URL Handler in MainViewController.kt
In MainViewController.kt (iOS-specific), implement the HandleUrl function:
/**
 * Handle a link (either an app link, universal link, or custom URL scheme link).
 * Called from SwiftUI's .onOpenURL modifier.
 */
fun HandleUrl(url: String) {
    val credentialOffers = globalCredentialOffers
    if (credentialOffers == null) {
        Logger.w(TAG, "HandleUrl: credentialOffers channel not yet initialized, URL will be ignored: $url")
        return
    }

    try {
        val koinHelper = object : KoinComponent { }
        val provisioningModel = koinHelper.get<ProvisioningModel>()
        val provisioningSupport = koinHelper.get<ProvisioningSupport>()

        org.multipaz.samples.wallet.cmp.util.handleUrl(
            url = url,
            credentialOffers = credentialOffers,
            provisioningModel = provisioningModel,
            provisioningSupport = provisioningSupport
        )
    } catch (e: Exception) {
        Logger.e(TAG, "Error in HandleUrl: ${e.message}", e)
    }
}
Step 4: Build and Run iOS App
To test the iOS implementation:
- Open in Xcode: Navigate to
iosApp → iosApp.xcodeproj(tested with Xcode 16.3) - Clean Build: In Xcode, go to Product → Clean Build Folder
- Run: Click Start the Active Scheme to build and run the app
- Important: The app can only run on a real iOS device, not on the iOS simulator. This is because credentials are stored in hardware-related secure storage (Secure Enclave) that is not available in simulators. Connect your physical iOS device and select it as the deployment target.
- You can now test the issuance flow on your physical device
Step-by-Step Implementation
Step 1: Project Setup and Exploration
1.1 Explore the Project Structure
Project Structure Overview
The following directory structure shows the key files and folders in the composeApp/src/commonMain/ directory:
composeApp/src/commonMain/
├── kotlin/
│   └── org/multipaz/samples/wallet/cmp/
│       ├── ui/                          # UI Components
│       │   ├── AccountScreen.kt
│       │   ├── ProvisioningTestScreen.kt
│       │   ├── Explore.kt
│       │   ├── Membership.kt
│       │   └── HomeScreen.kt
│       ├── di/                          # Dependency Injection
│       │   ├── InitKoin.kt
│       │   └── MultipazModule.kt
│       ├── util/                        # Utilities
│       │   ├── AppSettingsModel.kt
│       │   ├── ProvisioningSupport.kt
│       │   ├── OpenID4VCILocalBackend.kt
│       │   ├── DocumentStoreExtensions.kt
│       │   ├── TestAppUtils.kt
│       │   └── Constants.kt
│       └── UtopiaSampleApp.kt          # Main app entry
└── composeResources/                    # Shared resources
    ├── drawable/                        # Images
    └── files/                           # Files (certificates, etc.)
        └── test_app_reader_root_certificate.pem
Android-specific structure:
composeApp/src/androidMain/
├── kotlin/
│   └── org/multipaz/samples/wallet/cmp/
│       ├── MainActivity.kt              # Main activity
│       ├── CredmanActivity.kt           # Credential manager
│       ├── NdefService.kt               # NDEF message service
│       └── UtopiaSampleApplication.kt   # Application class
├── res/                                 # Android resources
│   ├── drawable/                        # Drawables
│   ├── drawable-v24/                    # API 24+ drawables
│   ├── mipmap-*/                        # App icons
│   ├── values/                          # Values (strings, colors)
│   └── xml/                             # XML configs
├── assets/                              # Android assets
└── AndroidManifest.xml                  # Manifest file
iOS-specific structure:
composeApp/src/iosMain/
└── kotlin/
    └── org/multipaz/samples/wallet/cmp/
        └── MainViewController.kt        # Main view controller
First, set your project's android:launchMode="singleInstance" in AndroidManifest.xml to prevent unnecessary recompositions, which may otherwise break the issuance process.
1.2 Understand the ProvisioningSupport & OpenID4VCILocalBackend Classes
OpenID4VCILocalBackend is a subclass of OpenID4VCIBackend, which is defined in the Multipaz library. ProvisioningSupport class is the bridge between your wallet and credential issuers. It handles authentication, authorization, and secure communication. ProvisioningSupport contains an instance of OpenID4VCILocalBackend.
1.3 Examine Key Methods
In ProvisioningSupport.kt:
processAppLinkInvocation:
// TODO: process app link invocation

lock.withLock {
    pendingLinksByState.remove(state)?.send(url)
}
In OpenID4VCILocalBackend.kt:
createJwtClientAssertion:
// TODO: create and assign JWT client assertion string

OpenID4VCIBackendUtil.createJwtClientAssertion(
    signingKey = clientAssertionKey,
    clientId = CLIENT_ID,
    authorizationServerIdentifier = authorizationServerIdentifier,
)
This method creates a fresh OAuth JWT client assertion based on the server-side key.
Step 2: Understanding URL Processing
Common URL Handler (Shared Code)
The app uses a common handleUrl function in UrlHandler.kt that works across both platforms:
/**
 * Handle a link (either an app link, universal link, or custom URL scheme link).
 * This is a common handler that can be used from both Android and iOS.
 */
fun handleUrl(
    url: String,
    credentialOffers: Channel<String>,
    provisioningModel: ProvisioningModel,
    provisioningSupport: ProvisioningSupport
) {
    // TODO: Implement URL handling and validation
    Logger.i(TAG, "handleUrl called with: $url")
    Logger.i(TAG, "handleUrl provisioningModel state: ${provisioningModel.state.value}")

    if (url.startsWith(OID4VCI_CREDENTIAL_OFFER_URL_SCHEME)
        || url.startsWith(HAIP_URL_SCHEME)
    ) {
        // Process credential offers
        val queryIndex = url.indexOf('?')
        if (queryIndex >= 0) {
            CoroutineScope(Dispatchers.Default).launch {
                credentialOffers.send(url)
            }
        }
    } else if (url.startsWith(ProvisioningSupport.APP_LINK_BASE_URL)) {
        // Process OAuth callbacks
        CoroutineScope(Dispatchers.Default).launch {
            try {
                provisioningSupport.processAppLinkInvocation(url)
            } catch (e: Exception) {
                Logger.e(TAG, "Error processing app link: ${e.message}", e)
            }
        }
    }
}
Platform-Specific URL Processing
Android (in MainActivity.kt):
//TODO: implement HandleUrl for Android
fun handleUrl(url: String) {
    handleUrl(
        url = url,
        credentialOffers = credentialOffers,
        provisioningModel = provisioningModel,
        provisioningSupport = provisioningSupport
    )
}
iOS (in MainViewController.kt):
//TODO: implement HandleUrl for iOS
fun HandleUrl(url: String) {
    // Retrieve dependencies from Koin
    val credentialOffers = globalCredentialOffers ?: return
    val koinHelper = object : KoinComponent { }
    val provisioningModel = koinHelper.get<ProvisioningModel>()
    val provisioningSupport = koinHelper.get<ProvisioningSupport>()

    // Call common handler
    org.multipaz.samples.wallet.cmp.util.handleUrl(
        url = url,
        credentialOffers = credentialOffers,
        provisioningModel = provisioningModel,
        provisioningSupport = provisioningSupport
    )
}
Credential Offer URLs: Start with openid-credential-offer:// or haip://
During provisioning, the app receives a URL from the server, and the client must perform specific processing based on that URL. MainActivity now centralizes this logic: credential-offer schemes are forwarded to the Compose UI through credentialOffers, while app links are passed to ProvisioningSupport.processAppLinkInvocation(...) inside a coroutine.
Step 3: Understanding the User Interface
ProvisioningTestScreen.kt
//TODO: update text depends on provisioningState
val text = when (provisioningState) {
            ProvisioningModel.Idle -> "Initializing..."
            ProvisioningModel.Initial -> "Starting provisioning..."
            ProvisioningModel.Connected -> "Connected to the back-end"
            ProvisioningModel.ProcessingAuthorization -> "Processing authorization..."
            ProvisioningModel.Authorized -> "Authorized"
            ProvisioningModel.RequestingCredentials -> "Requesting credentials..."
            ProvisioningModel.CredentialsIssued -> "Credentials issued"
            is ProvisioningModel.Error -> throw IllegalStateException()
            is ProvisioningModel.Authorizing -> throw IllegalStateException()
        }
         Text(
             modifier = Modifier
                 .align(Alignment.CenterHorizontally)
                 .padding(8.dp),
             style = MaterialTheme.typography.titleLarge,
             text = text
         )
The provisioning flow progresses through the following states: Idle, Connected, ProcessingAuthorization, RequestingCredentials,CredentialsIssued, etc. Your application should monitor the current provisioning state and display a notification that corresponds to it.
Step 4: Understanding Authorization
4.1 Authorization Handler
In ProvisioningTestScreen.kt
//TODO: init  EvidenceRequestWebView
EvidenceRequestWebView(
    evidenceRequest = challenge,
    provisioningModel = provisioningModel,
    provisioningSupport = provisioningSupport
)
EvidenceRequestWebView is called inside Authorize function. The Authorize function receives a list of authorization challenges ,handles OAuth challenges and Calls EvidenceRequestWebView for OAuth challenges
4.2 OAuth Flow Handler
//TODO: add provideAuthorizationResponse
 provisioningModel.provideAuthorizationResponse(
            AuthorizationResponse.OAuth(stableEvidenceRequest.id, invokedUrl)
        )
What it do:
- OAuth Challenge Handling: Receives an OAuth authorization challenge from the issuer
- External Browser Launch: Opens the user's default browser with the OAuth URL
- Callback Management: Waits for the user to complete authentication and return via app links
- Response Processing: Handles the OAuth callback and provides the response to the provisioning model
It launches the external browser instead and manages the OAuth flow through app links.
Step 5: Credential Registration and Navigation
After credentials are issued, the app needs to properly register them with the W3C Digital Credentials API (on Android) so they're available for web and native verification.
5.1 App-Level Registration Refresh
In UtopiaSampleApp.kt, add the following LaunchedEffect blocks to refresh credential registration at key moments:
// TODO: implement DC registration refreshing

LaunchedEffect(Unit) {
    registrationManager.refresh("app start")
}

LaunchedEffect(provisioningModel) {
    provisioningModel.state.collect { state ->
        if (state == ProvisioningModel.CredentialsIssued) {
            registrationManager.refresh("credentials issued")
        }
    }
}
Key changes:
- Refresh on app start:
LaunchedEffect(Unit)runs once when the app starts - Refresh when credentials are issued: Monitor
provisioningModel.stateand refresh when state becomesCredentialsIssued - Refresh when returning from provisioning: Call
refresh()before navigating back to main screen usingpopBackStack()instead ofnavigate()to properly manage the back stack (already implemented)
Step 6 (Optional): APP_LINK_SERVER Configuration and OAuth Callback Handling
| Info: This section explains an optional configuration. The Wholesale Codelab uses custom schemes by default, so the app should work without applying these steps, since custom intents do not require verification. |
|---|
The APP_LINK_SERVER is a critical component that enables OAuth callback handling through deep links on both Android and iOS. This section explains how it works and how to configure it properly.
5.1 What is APP_LINK_SERVER?
By default, we are using Custom URL scheme rather than HTTP App Links.
The APP_LINK_SERVER serves as the OAuth callback endpoint for your credential provisioning flow. It's the URL where the external browser redirects after the user completes OAuth authentication.
companion object Companion {
        // Default custom scheme (enabled in AndroidManifest.xml and Info.plist)
        const val APP_LINK_SERVER = "wholesale-test-app"
        const val APP_LINK_BASE_URL = "${APP_LINK_SERVER}://landing/"

        // Alternative HTTP App Links (more secure). See AndroidManifest.xml Option #2 and iOS Associated Domains
        /*const val APP_LINK_SERVER = "https://apps.multipaz.org"
        const val APP_LINK_BASE_URL = "$APP_LINK_SERVER/landing/"*/

}
5.2 Platform-Specific Configuration
Android Configuration
The codelab enables custom URI schemes out of the box. This intent filter matches the default configuration (wholesale-test-app://landing):
<!-- Option #1 - Custom URI Scheme (default) -->
<!-- Must match ApplicationSupportLocal.APP_LINK_SERVER -->
<intent-filter>
    <action android:name="android.intent.action.VIEW" />
    <category android:name="android.intent.category.DEFAULT" />
    <category android:name="android.intent.category.BROWSABLE" />
    <data android:scheme="wholesale-test-app"/>
    <data android:host="landing"/>
</intent-filter>

<!-- Option #2 - HTTPS App Links - Requires .well-known/assetlinks.json -->
<!-- Examples: https://apps.multipaz.org/landing/ -->
<!-- Must match ApplicationSupportLocal.APP_LINK_SERVER -->
<!--<intent-filter android:autoVerify="true">
    <action android:name="android.intent.action.VIEW" />
    <category android:name="android.intent.category.DEFAULT" />
    <category android:name="android.intent.category.BROWSABLE" />

    <!--
    Do not include other schemes, only https. If domain is changed here, it
    also MUST be changed in ApplicationSupportLocal class.
     -->
    <data
        android:scheme="https"
        android:host="apps.multipaz.org"
        android:pathPattern="/landing/.*"/>
</intent-filter>-->
If you use HTTP App Links in your app, since your app's fingerprint has not been uploaded to the " apps.multipaz.org" website, app links from the website cannot be handled by the app and will instead open in the browser.
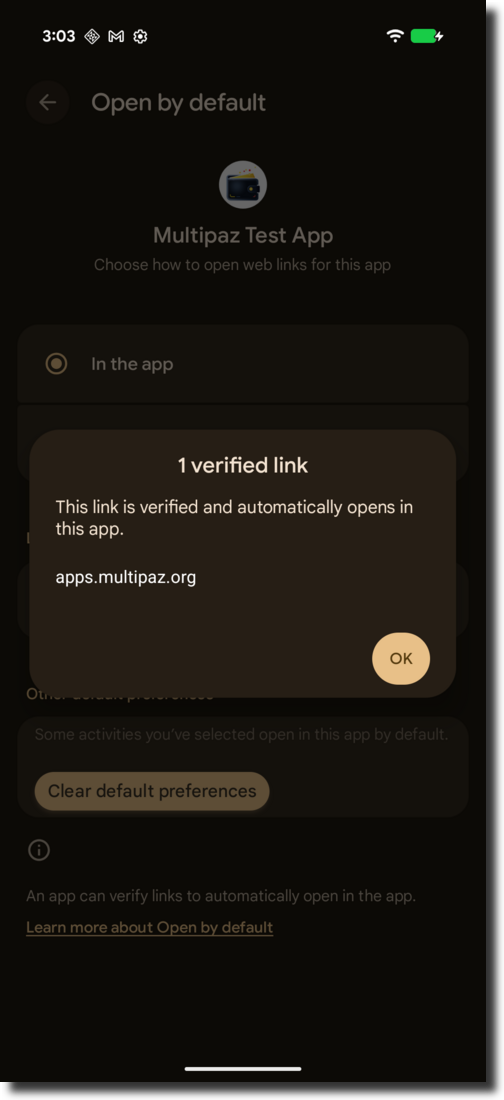
You have to register your app's fingerprint on the Multipaz server (or your own website). If your app's fingerprint is registered successfully: Long click your app and click App Info → Open by default, you will see "1 verified Link" just like below:

If you click "1 verified link", you will see apps.multipaz.org (or your website link) is verified just like below:
For more Verify App Links knowledge, check the official documentation.
iOS Configuration
For iOS, the custom URL scheme is configured in Info.plist:
<key>CFBundleURLTypes</key>
<array>
    <dict>
        <key>CFBundleTypeRole</key>
        <string>Viewer</string>
        <key>CFBundleURLName</key>
        <string>org.multipaz.samples.wallet</string>
        <key>CFBundleURLSchemes</key>
        <array>
            <string>wholesale-test-app</string>
        </array>
    </dict>
</array>
For HTTPS Universal Links (Optional - Higher Security):
- Add Associated Domains to your app's entitlements (
iosApp.entitlements):
<key>com.apple.developer.associated-domains</key>
<array>
    <string>applinks:apps.multipaz.org</string>
</array>
- Host an
apple-app-site-associationfile athttps://apps.multipaz.org/.well-known/apple-app-site-association:
{
    "applinks": {
        "apps": [],
        "details": [
            {
                "appID": "TEAM_ID.org.multipaz.samples.wallet.cmp",
                "paths": ["/landing/*"]
            }
        ]
    }
}
5.3 App Link Verification and Trust
Custom URI (Low Security):
- No verification required
- Works immediately for testing
- Less secure but easier to set up
- Works on both Android and iOS
App Links/Universal Links (High Security):
- Android: Requires
.well-known/assetlinks.jsonon the server with app's signing certificate fingerprint - iOS: Requires
.well-known/apple-app-site-associationon the server with Team ID and Bundle ID - Platform automatically verifies the trust relationship
- More secure but requires server configuration
Step 7 (Optional): Set up your Own Credential Server
If you are setting up your own credential server, the steps below will guide you through configuring both Android and iOS apps.
6.1 Update Client Configuration
In ProvisioningSupport.kt, change the constants to point to your server:
companion object Companion {
    // Your custom server
    const val APP_LINK_SERVER = "https://your-server.com"
    const val APP_LINK_BASE_URL = "$APP_LINK_SERVER/landing/"
}
6.2 Android Configuration
Update AndroidManifest.xml:
<intent-filter android:autoVerify="true">
    <action android:name="android.intent.action.VIEW" />
    <category android:name="android.intent.category.DEFAULT" />
    <category android:name="android.intent.category.BROWSABLE" />
    <data
        android:scheme="https"
        android:host="your-server.com"
        android:pathPattern="/landing/.*"/>
</intent-filter>
Create assetlinks.json:
Upload this file to https://your-server.com/.well-known/assetlinks.json:
[
    {
        "relation": [
            "delegate_permission/common.handle_all_urls"
        ],
        "target": {
            "namespace": "android_app",
            "package_name": "org.multipaz.samples.wallet.cmp",
            "sha256_cert_fingerprints": [
                "YOUR_APP_SIGNING_CERTIFICATE_FINGERPRINT"
            ]
        }
    }
]
To get your app's signing certificate fingerprint, run:
keytool -list -v -keystore your-keystore.jks -alias your-key-alias
6.3 iOS Configuration
Update Info.plist (for custom schemes only):
If you're only using custom schemes, update the scheme name:
<key>CFBundleURLSchemes</key>
<array>
    <string>your-custom-scheme</string>
</array>
For Universal Links:
- Add Associated Domains in Xcode:
- Select your target in Xcode
- Go to Signing & Capabilities
- Click + Capability and add Associated Domains
- Add:
applinks:your-server.com
- Update iosApp.entitlements:
<key>com.apple.developer.associated-domains</key>
<array>
    <string>applinks:your-server.com</string>
</array>
- Create apple-app-site-association:
Upload this file to https://your-server.com/.well-known/apple-app-site-association:
{
    "applinks": {
        "apps": [],
        "details": [
            {
                "appID": "YOUR_TEAM_ID.org.multipaz.samples.wallet.cmp",
                "paths": ["/landing/*"]
            }
        ]
    }
}
To find your Team ID:
- Open Xcode
- Go to your project settings
- Select your target
- Look for Team in the Signing & Capabilities tab
Note: The apple-app-site-association file must be served with HTTPS and with the content type
application/json or no content type at all.
Security Features
private val attestationCertificate by lazy {
            runBlocking {
                X509Cert.fromPem(
                    Res.readBytes("files/attestationCertificate.pem").decodeToString().trimIndent()
                )
            }
        }

private val attestationPrivateKey =
            runBlocking {
                EcPrivateKey.fromPem(Res.readBytes("files/attestationPrivateKey.pem").decodeToString().trimIndent().trimIndent(),
                    attestationCertificate.ecPublicKey
                )
            }
What are Attestation Certificate and Private Key?
Attestation Certificate (attestationCertificate):
- An X.509 digital certificate that proves the wallet's identity and security properties
- Contains the wallet's public key and metadata (issuer, validity period, etc.)
- Acts as a "digital passport" that issuers can trust
- In this implementation, it's embedded in the app for testing purposes
Attestation Private Key (attestationPrivateKey):
- The corresponding private key used to sign attestation tokens
- Must be kept secret and secure
- Used to prove that the wallet actually controls the certificate